Your KYC is a mandatory rule set by the Reserve Bank of India (RBI) under Master Direction – KYC, 2016 (updated January 4, 2024). The Bank of India sets rules for every customer or account holder, new or existing, to periodically update their KYC details. If you are a Bank of India customer, you need to use the official BOI KYC Form (Customer Information Updation) for this process.
What Is the BOI KYC Form?
Your KYC Form issued by Bank of India is an official two-page document available in multiple languages, Hindi, Tamil, or Gujarati, as per your branch location. However, the form is available only in English on the official website, but bilingual or Hindi versions can be collected from your home branch.
It is used to:
- When you opened a savings account via a branch, you were required the form for your Latest KYC documents
- If you want to update any existing KYC information (address, contact details, etc.).
- When the bank notifies you of periodic re-KYC for your account, you need this form at the branch.
- It is also required to generate a CKYC number for you. CERSAI is the government-authorised body that manages the CKYC registry.
What is BOI’s AML/KYC/CFT Policy
Let’s divide the terms into full form first –
- AML = Anti-Money Laundering
- KYC = Know Your Customer
- CFT = Combating Financing of Terrorism
These policies required customer information to calculate the risk –
- Customer identity verification.
- Monitoring of suspicious transactions.
- Compliance with FIU-IND and RBI norms.
- Security of the Indian banking system against financial crimes.
This policy works under the same RBI Master Direction on KYC and applies to all customers of BOI.
How to Find & Download the Official BOI KYC Form
You must always use the official form (physical or digital) from the Bank of India website or a branch only. Here’s where you will get your latest form –
Step-by-Step Process
| Step | Action |
|---|---|
| 1 | First of all, you have to visit the official website of the Bank of India – https://bankofindia.bank.in/ |
| 2 | Scroll down to the bottom of the homepage. works on both smartphones and PC. |
| 3 | Under the “Useful Links” section in the footer, you will get the “AML/KYC” option. |
| 4 | On the AML/KYC page, scroll down to find “KYC / Re-KYC Documents.” |
| 5 | Click on “KYC Form” to open and download the form. |
| 6 | This is the English version official PDF file only; the MS Word editable option is not available on the website. |
If having issues on the site, you can directly get the original file from here with 1 click-
Direct Official Download Links
| Form Name | Description | Official Link |
|---|---|---|
| BOI KYC Form (Customer Information Updation) | Used for new customers and for Re-KYC (existing customers). English file. | Download BOI KYC Form (PDF) |
| Form 60 (for customers without PAN) | To be submitted if you don’t have a PAN card or if your PAN application is in process. | Download Form 60 (PDF) |
Documents Required for KYC / Re-KYC
After getting the form from the branch or website, you will need at least one Officially Valid Document (OVD) each for identity proof and address proof. You can check the BOI KYC E-documentation for additional and specific documents if your case is special.
Acceptable OVDs:
| Identity Proof | Address Proof |
|---|---|
| Aadhaar Card | Aadhaar Card |
| Passport | Passport |
| Driving Licence | Driving Licence |
| Voter ID | Voter ID |
| PAN Card | Utility Bill (water, electricity, LPG not more than 2 months old) |
| NREGA Job Card | Rent/Lease Agreement |
| NPR Letter | Employer Certificate |
All copies must be a photocopy of the original document, such as the Original PAN only. Carry originals also at the branch if required.
For NRI / PIO / OCI Customers in BOI
If you are an NRI, PIO, or OCI customer, additional documents are required:
| Document Type | Example |
|---|---|
| Identity Proof | Valid Passport, OCI Card |
| Non-Resident Status Proof | Valid Visa / Work Permit / National ID |
| Photograph | Recent colour photo |
| Overseas Address Proof | Passport, Utility Bill (within 2 months), Rent Agreement, Overseas Bank Statement, or Employer Certificate |
Documents sent via post/email must be attested by:
- Indian Embassy or Consulate
- Notary Public
- Magistrate / Judge
- Authorised officials of Indian banks overseas
How to Fill the BOI KYC Form
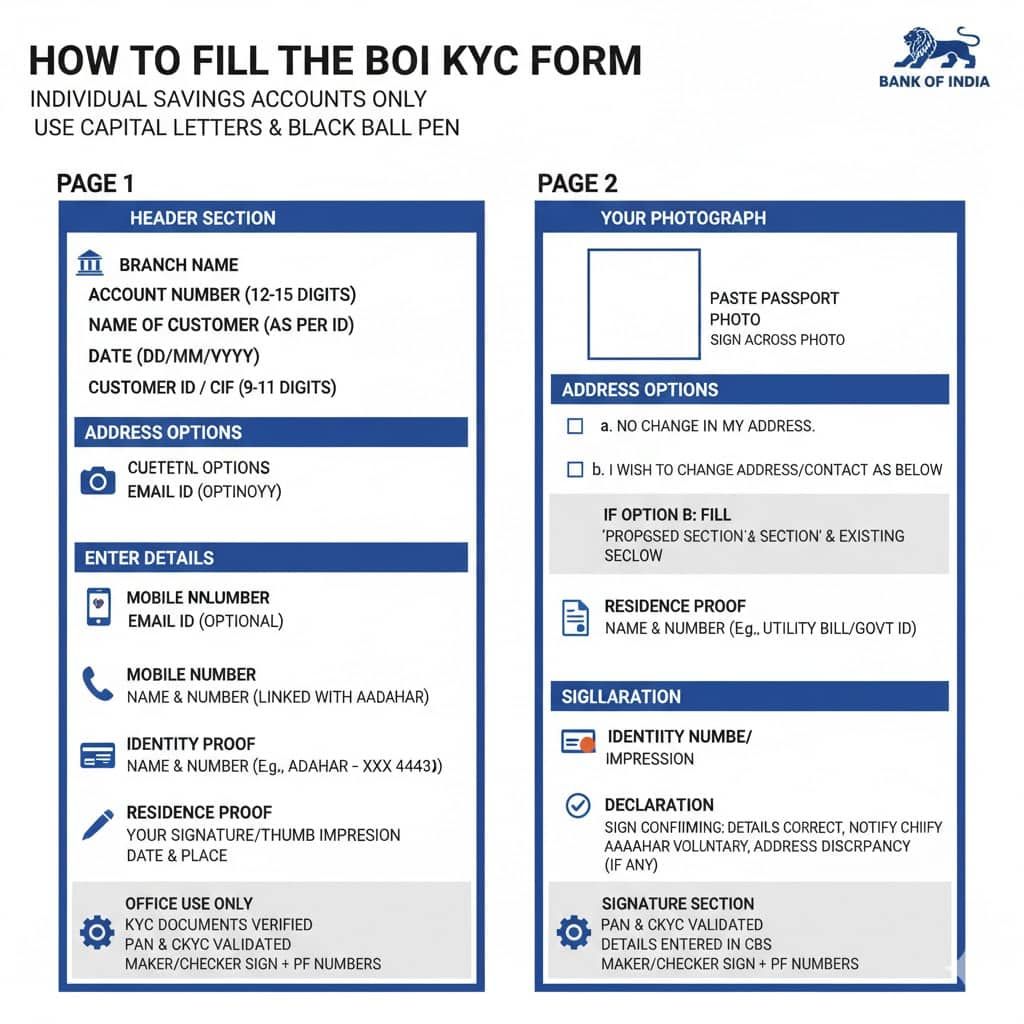
The BOI KYC Form is a two-page form that’s simple to fill out. But you have to use capital words and use a regular ball pen, start with the top, once you understand the options to fill, this becomes so easy for you. It is an individual savings account holder only. This won’t work for corporate accounts. If you joint account holder, you need two forms separately for filling. let start filling –
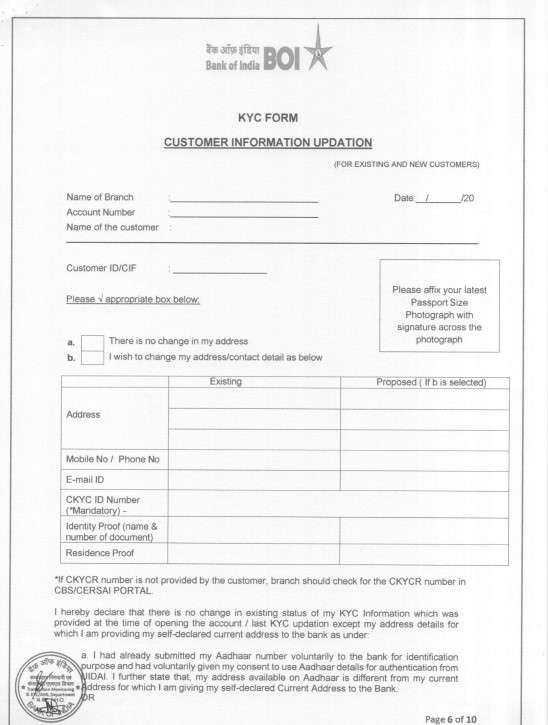
The first page of the BOI KYC Form
- Header section
- Branch Name – first write down the name of your home branch. (where your account is maintained and opened)
- Account number – Write your complete 12 to 15-digit account number.
- Name of Customer: Your Full name as per PAN/Aadhaar or your passbook.
- Date: Write the date when you submit to the counter.
- Customer ID / CIF: Available on your passbook or account statement. If not found, check on your mobile app in the my profile section. It is a 9 to 11-digit number front page of bank documents, such as a chequebook.
- Your Photograph: Now, you have to paste your recent passport-size colour photo and sign across it. Sign between form + photo, you can confirm with your branch.
- Choose Between Address Options
- This option is required for the address –
- ☐ a. No change in my address.
- (Tick this if your address and contact details remain the same.)
- ☐ b. I wish to change my address/contact details as below.
- (Tick this if you are updating your address)
- If you select Option B, you have to fill out the new address in the “Proposed section”, + your existing address is also required in the existing section.
- Enter details
- Mobile number: Now, enter your Mobile number (must be linked with your aadhaar OTP)
- Email ID: You can enter your email, existing or new. if no active email account, ignore it.
- CKYC ID Number: You have to enter your full CKYC number. If no idea, the branch will check it in the CBS/CERSAI portal. Or you can find it; check the CKYC section below to find it.
- Identity Proof: Name and number (such as Aadhaar – XXXX 4443)
- Residence Proof: Name and number of the address proof document – your utility bills or govt-approved ID card.
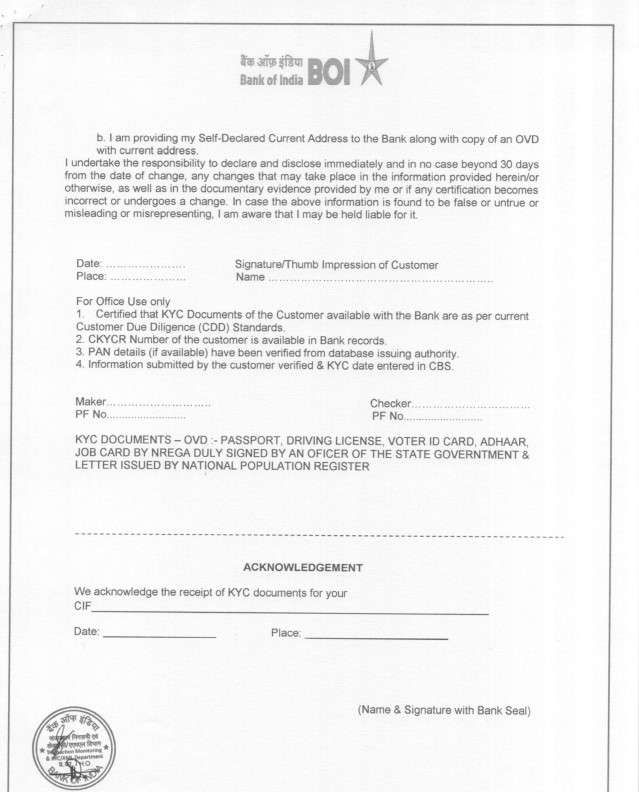
- Declaration: You must sign a declaration confirming:
- Your KYC details are correct.
- You will inform the bank within 30 days of any future change.
- You voluntarily submitted Aadhaar (if applicable).
- If your Aadhaar address differs, you’re providing a self-declared current address + Xerox copy
- Signature Section
- Now, just sign or put your thumb impression at the bottom.
- Write Date and Place clearly.
- Office Use Only – This section is filled by the branch staff:
- KYC documents verified
- PAN and CKYC validated
- Details entered in CBS
- Maker/Checker staff sign with PF numbers
The second page of the Bank of India KYC Application Form
How to Submit the KYC Form
Bank of India allows multiple submission modes for customer convenience.
| Submission Mode | How It Works |
|---|---|
| In Person Visiting home branch (Preferred) | Visit your home branch or any BOI branch with your filled form and a scanned copy of documents such as Aadhar + PAN or Form 60. You have to sign both photocopies of the documents. |
| By Post/Courier | Send self-attested copies of your form and documents to your home branch. |
| By Email | Email scanned, self-attested documents from your registered email ID to your home branch email. |
| For NRI Customers | Send attested scanned copies via post or email to your branch from abroad. |
Bank of India Re-KYC via SMS (If No Change in Details)
If none of your details have changed, you can update your KYC by sending an SMS to the BOB system without visiting any branch. Let’s check
- first, open your phone’s SMS app, and enter 8800501128 in the send to section.
- Write SMS – REKYC (6 DIGITS OF ACCOUNT NUMBER) Y,
- Just put space, no special words.
- Send it using your account-linked mobile number.
After 1 minute, you will get an SMS – “Dear BOI Customer, your ReKYC request has been successfully updated in our system.”
If not received any SMS or the account is still not operating after 24 hours, you have to visit your home branch for the application process.
How to Get Your CKYC Number
You can get your CKYC ID Card, where you find your CKYC number. There are two options to locate it –
| Method | Description |
|---|---|
| Online | Visit https://www.ckycindia.in/kyc/getkyccard, put your mobile number and OTP for CKYC details on your phone. |
| By Missed Call | Give a missed call to 7799022129 from your registered mobile number. You’ll receive your SMS with the ID Card. |
Customer Also Ask
How can I verify whether my KYC is due or not online for BOI accounts without visiting the branch?
You can check your KYC status online via the BOI KYC Grievances Portal. Simply log in using your account number and mobile OTP to track it. Alternatively, you can confirm via the customer helpline of BOI 1800 220 229 (Toll-free).
How long does BOI KYC Form verification take after submission at the branch?
Typically, the BOI bank provides a timing between 5 and 7 working days. However, in most cases, it just takes 48 hours. In case your process is taking more than a week, you can contact your branch for any pending requirements for your account.
Can I submit the BOI KYC form without Aadhaar?
Yes, you can use alternate photocopies of documents like your Passport, Voter ID, Driving Licence, NREGA Job Card, or Form 60 if PAN is unavailable.
Is it necessary to mention the CKYC number in the BOI KYC form?
While not mandatory, providing your CKYC number helps process faster digitally and helps re-kyc online in future. You can confirm with your branch.
Can I submit the BOI KYC form at any branch or only my home branch?
BOI prefers the home branch because CIF and CKYC checks happen there. Other branches may accept it, but approval often takes 3–6 extra working days due to internal routing.
What is the most common reason BOI KYC forms get delayed?
Missing signature across the photograph or unsigned photocopies. Nearly 1 out of 3 delays happens because customers forget to self-attest PAN or Aadhaar copies properly.
Is SMS-based Re-KYC always accepted by Bank of India?
No. SMS Re-KYC works only if no details changed and your mobile is linked. If the address or PAN differs, the system auto-rejects and asks for branch submission.
How can I avoid multiple BOI branch visits for KYC?
Carry originals + self-attested copies, paste the photo neatly, sign across the photo, and submit before 1 PM. Morning submissions are often uploaded the same day in CBS.
What should homemakers or non-earning customers write in income details?
Write “Housewife” or “Dependent” and enter a nominal annual credit, like ₹50,000–₹1,00,000. BOI doesn’t reject low income—blank fields cause issues.
How important is CKYC for faster BOI KYC approval?
Very useful. Accounts with CKYC usually update within 24–48 hours, while non-CKYC cases may take 5–7 days, especially when documents are manually verified.
Does BOI accept online utility bills as address proof?
Some branches accept printed e-bills (electricity or gas) within 2 months, but many still insist on stamped originals. Tip: Confirm with the counter before printing.