The KYC process is a mandatory part of banking after the new Guidelines of the RBI. For PNB account holders, you have to complete your KYC after opening an account or Re-KYC periodically or when you update any key details like address, Aadhaar, or PAN.
All Banks, including PNB, must update KYC details every few years, depending on the RBI customer risk category:
- Low risk: Every 10 years
- Medium risk: Every 8 years
- High risk: Every 2 years
Submitting the KYC Form or Online E-KYC is necessary for this process. Let’s explore –
About the PNB KYC Form
The PNB KYC form, also known as the specimen proforma for KYC updation. It is a single sheet, regular form, issued in PDF or Physical version by Punjab National Bank. It is available to savings/current account holders for cases –
- New account opening (KYC)
- Periodic update (Re-KYC)
- Account reactivation
- Linking Aadhaar or PAN
- Mobile number or address update
- Consent for Online KYC in future
This form is available in hindi, English, and other local languages. It also works as a bilingual in some branches. If you have a joint account, you need to fill out two separate forms for KYC.
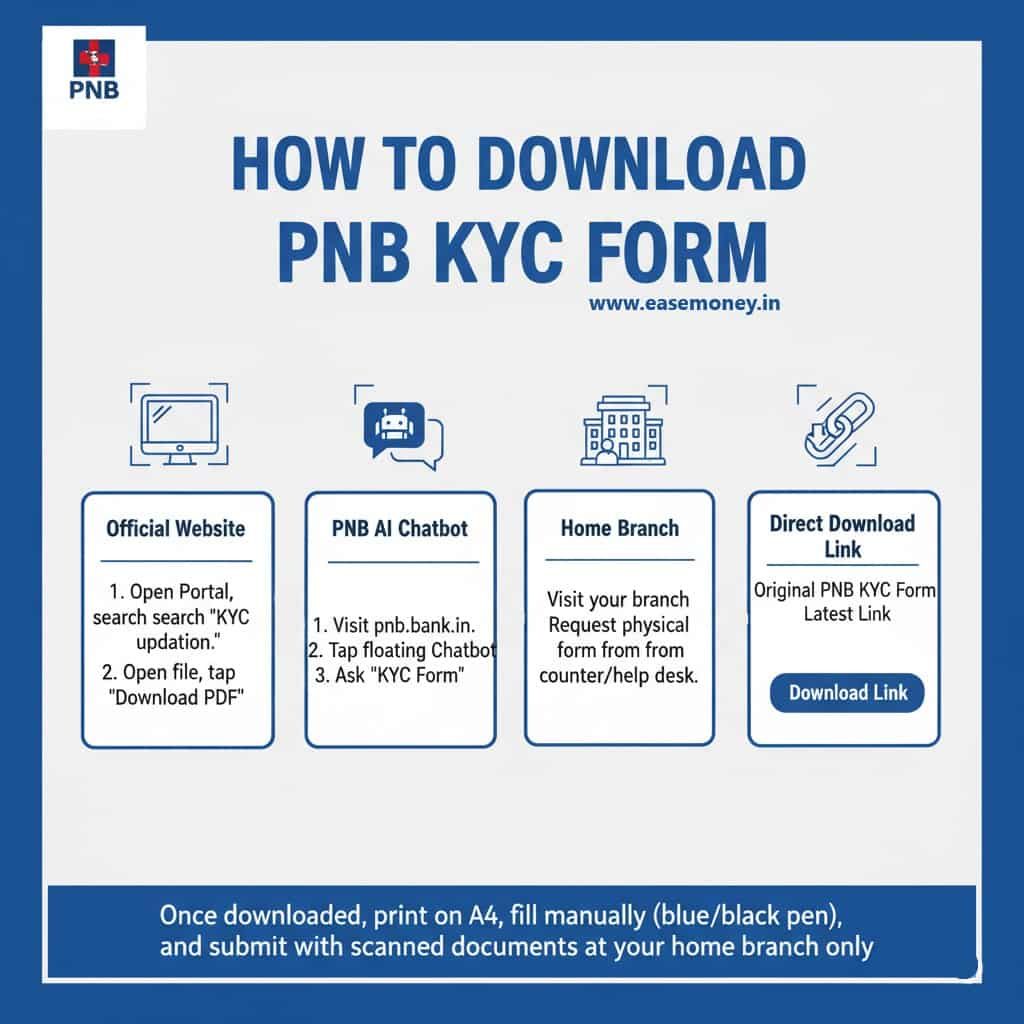
How to Download, Print, and Save the KYC Form
You can get the PNB KYC form in multiple ways:
| Source | How to Access |
|---|---|
| Official Website | Firstly, open Portal, search for “KYC updation”, open the file, and tap on download PDF |
| PNB AI Chatbot | Visit pnb.bank.in → tap on floating Chatbot → Ask “KYC Form” |
| Home Branch | Visit your branch and request the physical form directly from the counter or customer help desk. |
| Direct Download Link | Original PNB KYC Form Latest Link |
Once downloaded, you can print it on A4 paper, fill it manually by using a regular blue or black pen, and submit it with the scanned copy of documents at your home branch only.
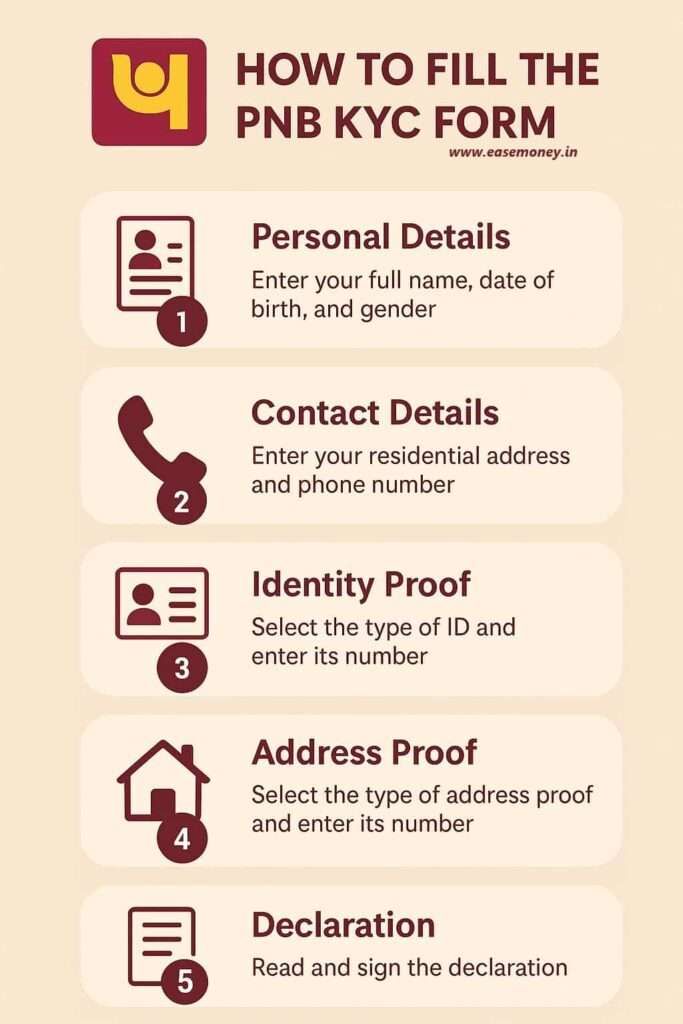
Step-by-Step: How to Fill the PNB KYC Form
Once you get the physical form, you have to fill it out properly from top to bottom, for KYC-
1. Basic Details
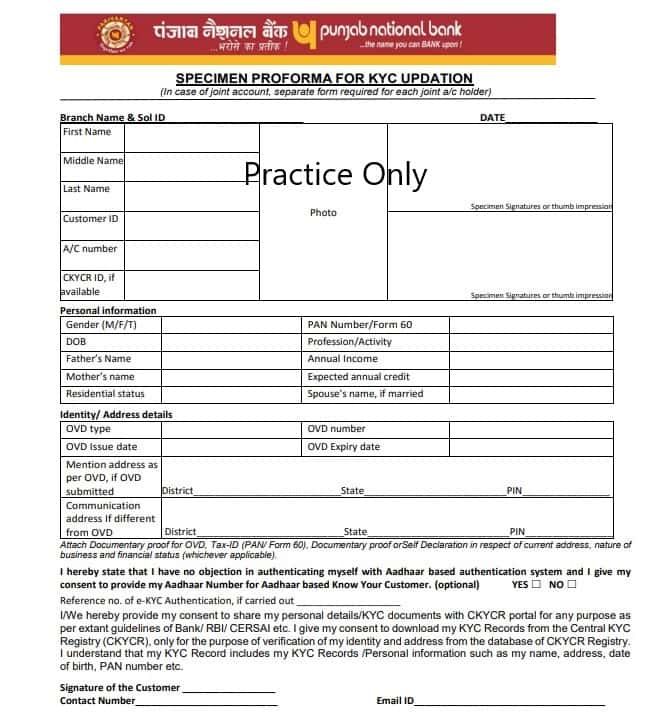
- Branch Name & SOL ID: You can start with the Branch name; simply use your passbook for that. (optional)
- Date: Write down the same date when you submit it.
- First, Middle, Last Name – put down your Aadhaar-based name, such as “PAAN, SINGH, TOMAR”
- Customer ID: In your Passbook, it will be printed as a CIF or Customer Number. Enter it. example – JHG003322
- A/C Number: Your account 12 to 16 digits, enter correctly. Check your PNB One app for it.
- CKYC ID: Optional, if you want, you can check by giving a missed call to 7799022129.
- Photo: Attach any recent passport photograph in front of it.
- Sign: You have to sign twice same as your cheque, or you can use your thumb impression as well.
2. Your Personal Information
- In this section, first, enter your Gender: “F, M, T”.
- Enter your Date of Birth, same as Aadhaar.
- Your mother and father’s names.
- Residential Status – Put – Indian / NRI / OCI.
- If you are married, only enter your spouse’s name.
- Profession or Occupation (Student, Salaried, Self-employed, Housewife, and anything)
- Your Basic Annual income and expected annual credit such as estimated at 3,00,000 annually. (pocket money, salary, make it total.).
- Enter your PAN Card. If not available, leave it blank and get Form 60.
3. Identity and Address Details
- Select the OVD (Your Officially Valid Document) type – Aadhaar, Passport, Voter ID, etc.
- Enter the OVD number, such as your 12-digit Aadhaar number.
- Issue date and expiry date (If selecting a driving license or passport). not required for aadhaar.
- Mention the address as printed on your OVD.
- Tip: Always write the PIN code from your OVD (example, Aadhaar), not from the passbook.
- Mention the communication address if different from the OVD address.
Note: For other communication address your branch may ask for additional documents; confirm first with your branch.
4. Consent Section
- Tick “YES” if you agree to Aadhaar-based KYC. It is optional, but better for future online E-KYC option, in future, you may not be required physical form.
- Tick consent to share details with CKYCR if required.
5. Signature and Contact Details
- Sign in the space provided.
- Write down your new mobile number and email ID (the new number will replace the old one in the bank’s records, but it must be linked with an aadhaar OTP).
- Done, you can ignore the “For Office use only” section.
Documents Required for PNB KYC / Re-KYC
Attach a printed, scanned photocopy with the document:
| Document Type | Accepted Proofs |
|---|---|
| Identity Proof | Aadhaar, Passport, Voter ID, Driving Licence, NREGA Job Card, |
| Address Proof | Aadhaar, Voter ID, Passport, Utility Bill (recent or last 3 months) |
| PAN or Form 60 | PAN Card or Form 60 (if PAN not available) |
| Photo | 1 recent Photo required |
How to Fill Form 60 (Quick Guide)
If you do not have a PAN card, Form 60 is mandatory. Your branch requests that. It is a self-declaration form saying that your income is below the taxable limit or that you have not applied for PAN.
Form 60 Download For PNB KYC
| Source | Download Link |
|---|---|
| Form 60 Official Link at PNB | Download Form 60 |
| From Branch | You can also collect physical form 60 from your home branch. |
Steps to Fill Form 60:
- Write your full name, date of birth, father’s name, and address in each row.
- Enter your PIN and mobile number.
- Leave blank for the number of transactions and the date of the transaction.
- Under “Details of transaction” – write “For KYC / Re-KYC of bank account.”
- Tick “Other” under the mode of transaction section.
- Enter your full aadhaar number in the UIDAI section.
- Enter your agricultural income or other income, anyone.
- Mention two ID documents (e.g., Aadhaar + Voter ID or Driving Licence).
- Check the document code back of the paper. such as Aadhaar Code is 01 and Voter ID code is 03.
- If you applied for PAN, enter the acknowledgement number; if not, just leave it blank.
- Sign and date the form.
How Long Does KYC Update Take?
- Online KYC update: Usually processed within 24 hours.
- Offline submission at the branch: It takes just 48 to 72 hours on regular working days after submission. If it takes more than 5 working days, it will depend on document verification. You may visit again and ask to track your request.
Once updated, you will receive a confirmation Text from PNB on your registered mobile number, or you can check your PNB mobile banking app.
How to Check Your KYC Status Online (PNB ONE App)
You can easily check your current KYC status using the PNB One mobile app after 48 hours:
- Open PNB One and log in using fingerprint or Mpin.
- Tap on “My Profile.”
- Tap on “Check KYC Status.”
- If KYC is pending, you will see an “Update KYC” button.
- Tap to complete online Re-KYC if eligible.
Special Cases: Students, Minors & No PAN
- Students / No Income: Write “Student” or “Dependent or Seeking employment” as a profession and estimate the annual credit you can put any small amount, such as Rs. 10,000, as a scholarship or Pocket money. Submit Form 60 if no PAN.
- Minors: Once 18, you have to go to your branch with Aadhaar + PAN/Form 60 to update KYC and convert to an individual account.
- Basic Savings Accounts: PAN is not mandatory, but you may have to provide Form 60 or 61 during KYC.
Notable FAQs
How to update KYC in PNB online?
You can use PNB Netbanking, log in using your CIF and password, go to My profile, My KYC, and request KYC details for updation.
What happens if PNB KYC is not updated?
Your account may be frozen (Google Pay or Paytm UPI and mobile banking will not work until your KYC is done by the system). In simple words, you might not be able to make deposits or withdrawals even at the branch.
What is the last date for PNB KYC update?
As per the last press release of PNB, the bank has recommended that customers complete KYC before 08.08.2025 to avoid any account limitations or temporary suspension.
How to get the PNB KYC form in Hindi?
Visit your home branch and ask for the KYC/Re-KYC form in Hindi, and you can also use bilingual forms.
Can I submit PNB Re-KYC at a different branch from where my account is held?
Mostly no. PNB prefers home-branch submission because CIF verification happens locally. Non-home branches may accept forms, but approval often gets delayed by 3–5 extra working days.
Why does PNB ask for estimated annual income during Re-KYC?
It helps PNB assign your RBI risk category. Even rough estimates are acceptable. Tip: never leave it blank—blank income fields are a top reason for KYC pending status.
Is CKYC ID mandatory while filling the PNB KYC form?
No, it’s optional. If you don’t know it, leave it blank. Branch staff can fetch CKYC internally. Missed-call checking saves time but isn’t compulsory.
Can I update the Aadhaar-linked mobile number during PNB KYC?
Yes. Many customers update it together. Ensure the new number is Aadhaar-linked, or future OTP-based services may fail even if KYC shows “Completed.”
How can I speed up PNB KYC approval at the branch?
Visit before 1 PM, carry originals + self-attested copies, and ask staff to upload immediately in Finacle. Same-day uploads often reflect approval within 24–48 hours.